How to Set Up the Ossila Slot Die Coater

The Ossila Slot Die Coater is designed to be accessible, adaptable and easy to optimize. It's low price point and small footprint make slot die coating suitable for most thin film coating labs.
We have tried to make our software and design as intuitive as possible. However with slot-die coating, there are several parameters you must to optimize and calibrated to achieve uniform thin films. Therefore, we have created this guide to help you set up the slot die coater and begin optimizing your large area thin film depositions.
Setting Up the Ossila Slot Die Coater
This video will provide a guide to installing and coating your first film with the Ossila Slot Die Coater V2. This set up will differ slightly from the Version 1 model, only in that the previous system uses a three point leveling system. You can still find the V1 manual on the slot die coater page.
Assembling the Slot Die Coater Head

The slot-die coater head is customizable and available in two designs, with maximum coating widths of 50 mm and 100 mm. Within this head, you can use shims and meniscus guides to control the flow of solution through the slot die head.
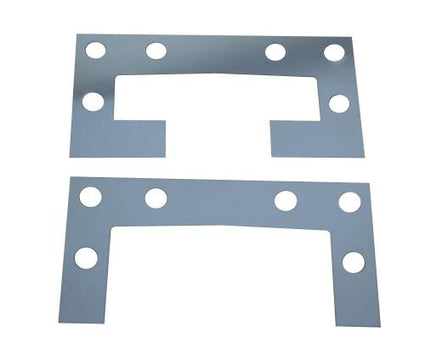
Use shims to vary the coating width for your deposition. The coating gap can vary from 5-50 mm depending on the shim you use.
You can also stack multiple shims to increase the deposition channel width. The volume of your solution channel will determine pressure drop accross the slot die head.y
To assemble the slot die coater head:
- Clean all components to makde sure there is no contamination
- Insert your chosen shims in between the two halves of the slot die coater head.
- Clamp the two halves of the slot die head using the four shorter corner screws.
Once the head is assembled, fix to the mountin bracket, using the two longer bolts.
Once the head is mounted, attach the Luer Lock adaptor. Make sure the plastic gaskets are in place to prevent leaking, and the safety clip is attached to the tube.
Levelling the Stage
To uniformly coat thin films over a wide coating width, the coating platform needs to be level and the slot die head should be parallel to the coating surface. Therefore you should level the slot die coater before each use.
To level the slot die coater stage:
- In manual mode, move the stage backwards until the height gauges no longer touch the stage.
- Turn the digital height gauges on by pressing ‘OFF/ON’ and zero them by pressing ‘Zero.
- Next, bring the stage forward so the gauges touch the slot die stage again.
- Using the single adjustment wheel at the back right of the stage, adjust until both readings on the height gauges are the same. Zero the height gauges so that they both read zero
- Next, move the stage forwards all the way. Adjust the front wheel until the values on both height gauges are as close to zero as possible on both sides. This difference should be no more that 75 µm.
Aligning the Slot Die Head to Your Substrate
The distance between the slot die coater head and the substrate is an important parameter. This is an important factor in forming a meniscus which will determine the stability of your coating bead. It is therefore important that you know this value as accurately as possible, so you must carefully align the slot die coater head to your substrate.
To align your slot-die head with your substrate:
- First, place your substrate underneath the slot die head. The side closest to the front will be coated first as programmed coating movements move backwards.
- Lower the head using both the micrometers until there is no visible gap between the head and the substrate.
- Then lower the head a few µm's at a time. Slide the substrate from side can move again.
- Repeat this at the front of the substrate, then zero the height gauges.
Define Your Coating Parameters
There are several paramaters you will have to optimize when setting up your slot die coater. Some of these factors you can predict, but some you will have to optimize empirically depending on your coating needs. These include:
- Hotplate Temperature: The temperature of the hotplate can have a significant affect on the drying mechanics of your film. You can set any temperature up to 140°C.
- Coating Length: Coating length determines the length that will be coated. This can be up to 150 mm (for Slot Die V2) but shouldn't exceed your substrate size.
- Coating Speed: This controls the movement of the stage, which moves your substrate beneath the slot-die head. The ideal coating speed for your coating depends on your solution viscosity, dispensing rate (flow rate), dispensing channel volume (determined by your shims), hotplate temperature and desired coating thickness.
- Dispensing Rate (or flow rate): The flow rate determines how quickly solution flows from your syringe to your coating reservoir, and subsequently to your substrate. For the Ossila slot die coater, this is measured in terms of syringe pump dispensing (µl/s). For this flow rate to be accurate, you will need to enter the correct syringe size in the settings tab. This will also need to optimize this factor based on your solution viscosity, slot-die head volume and channel reservoir, your substrate temperature and your desired coating thickness.
- Deposition Steps: You can use multiple steps to more tightly control your depsoition. Using multiple step can help curb neck in and tail off effects.
Slot Die Coater

Learn More
 Slot Die Coating: Theory, Design, & Applications
Slot die coating is an extremely versatile deposition technique in which a solution is delivered onto a substrate via a narrow slot positioned close to the surface.
Read more... Upgrading the Ossila Slot Die Coater
Slot die coaters are high-precision coating systems designed to apply a uniform thin films to over larger areas. This technology is widely used in industries such as electronics, photovoltaics, pharmaceuticals, and packaging due to its accuracy, repeatability, and scalability.
Read more...