Antechamber of a Glove Box

An antechamber allows easy access to your glove box without compromising the internal environment. Antechambers are small chambers used to transport items into or out of the main chamber. Similar to an air lock, there are sealable openings between the antechamber, the main chamber, and the laboratory.
Antechambers are much smaller than the main chambers so can be exposed to ambient conditions more often. It will take much less time to achieve inert conditions within this smaller volume.

Flushed Antechamber vs. Vacuum Antechamber
The main goal of an antechamber is to quickly and completely replace air within it with inert gas. There are two main ways to achieve this goal: using a vacuum pump or flushing the system with inert gas.
Large, regeneration glove boxes use vacuum antechamber systems, where the antechamber is connected to an inert gas source and also to a vacuum pump. With these antechambers, after exposing the inside to ambient conditions, you open the valve to the vacuum pump. All the air is removed from the antechamber. Once the air is removed, you close the valve to vacuum pump and open the valve to the inert gas. The antechamber is then filled with your inert gas. The antechamber is "cycled" several times. Then the antechamber can be opened to main chamber.
The other alternative is flushed antechambers. To cycle flushed antechambers, you open the valves connected to the outlet waste stream and inert gas inlet at the same time. This will flush the system with nitrogen, forcing air out through the waste stream as the system tries to maintain a set pressure. Most flushed antechambers do not monitor internal conditions, so you have to flush the system for an long time to ensure all air is gone. This can be wasteful and costly.
Ossila Glove Box Antechamber
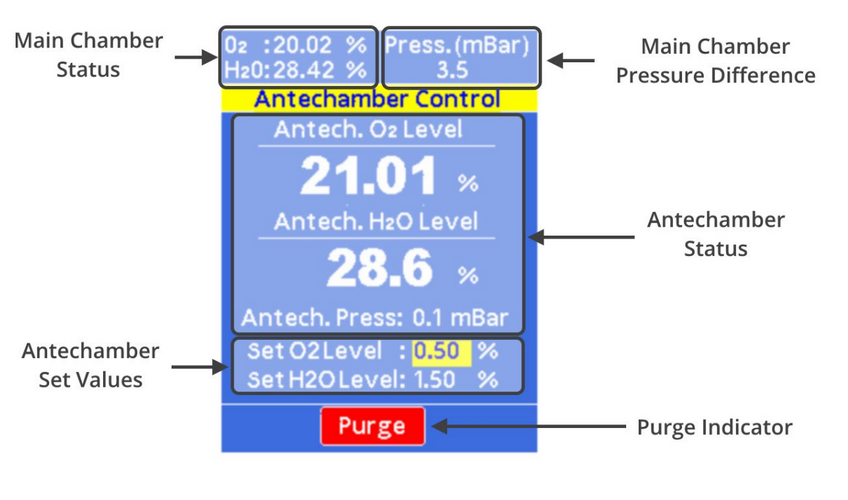
Our benchtop glove box uses a flushed antechamber system. However, it also continually monitors and displays antechamber oxygen, moisture and pressure levels. This allows it the simple set-up and minimal upkeep of a flushed antechamber system, without unnecessary use of inert gas. The preprogramed antechamber purge software will flush the antechamber until moisture and oxygen levels fall below your set values. It will then wait for a few seconds to see if this remains stable, then begin flushing again if necessary. It will continue this process until the antechamber remains consistently below these set values. This all happens at the touch of a button.
Like the main chamber, the antechamber in our glove box is designed to provide to protect internal inert conditions:
- The antechamber is made from grade 304 stainless steel to reduce ingress.
- It also contains a high accuracy sensor board, which monitors its internal environment.
- Oxygen and moisture values are displayed at all times on the display screen.
- The automated antechamber purge function means the antechamber can reach inert conditions quickly and easily after being exposed to air.
Glove Box

How to Use a Glove Box Antechamber
The Ossila Glove Box features an automated purge cycle as per the standard operating procedure. This uses the same procedure that is used for the main chamber, and should reduce the chances of accidentally exposing ambient oxygen or humidity.
Before doing anything, always check oxygen and humidity levels before exposing the antechamber to the main chamber.
Taking Samples In
- First, ensure that the door between the main chamber and the antechamber is closed.
- Open the door between the antechamber and outside lab. Then, place your materials or equipment into the antechamber and shut the door.
- Go to the antechamber splash page and set desired O2 and H2O levels.

- Check both doors are shut, then press the "Start Purge" button on the control panel.
- Once the purge is complete, you can safely move your items into the main chamber of the glove box.
Removing Materials
- Check the O2 and H2O levels within the antechamber.
- If these are higher than the desired levels, or at least not matching those in the main chamber, set the antechamber O2 and H2O levels and press "Start Purge".
- Once the antechamber purge cycle has finished, place the items from the main chamber into the antechamber and close the internal door. You can then take the items straight out into ambient conditions. However, if you have been processing with hazardous solvents, it is often a good idea to purge for a few seconds before opening the glove box.
- It is good practice to cycle the antechamber at least once directly after it has been exposed to air. This reduces the chances of accidentally flooding the whole system with oxygen.
Glove Box
