Solar Simulator Design, Working Principles & Optics

The most vital part of a solar simulator is, of course, the light source. However, solar simulators can be assembled with several other components to bring the simulated spectrum closer to the solar spectrum and ensure that this light is uniformly distributed across the defined test area. These components include filters, lens, power sources and control elements — all of which must be suited to your chosen light source.
Light Source
The main component of a solar simulator is the calibrated light source. The most commonly used light sources are Xenon arc lamps, but the development of high intensity LEDs has meant that LED solar simulator lamps are becoming more popular. LED light sources have longer lifetimes than their arc lamp alternatives. They are also more compact and are less expensive.
The most important factor about your light source, and therefore the solar simulator as a whole, is that it is well calibrated. There are specific calibration standards that every solar simulator must meet in order to gain a classification grade — A, B or C.
The types of control systems and power sources you will need for your solar simulator will depend on the type of light source that you use. For example, a Xenon arc lamp will require an expensive power source to reduce any spectral changes in the output with time. An LED-array light source won't need this, but it will require a more complex control system as each LED will have to be controlled individually.
Sample Height
The arrangement of a solar simulator is quite simple: the light source is directed towards a test area, and the irradiance over that test area should meet the defined standards. It is therefore important to make sure that your light source is at the correct distance from your sample. For some solar simulator systems, you can vary the distance between the sample stage and light source, allowing you to measure samples of various thicknesses.
Point light sources, such as a filament light bulb, radiate light uniformly in all directions. In collimated light beams, light travels in parallel rays in one direction to reduce spread as it propagates. Light can be produces as a collimated light source, e.g., in lasers, or you can manipulate light from a point source into a collimated beam using lenses or mirrors.
For a point light source, the intensity of light measured at a point, d, from thesource varies according to the inverse square law.
While the inverse square law does play a role in the spread of collimated light beams, it does not directly correlate to light intensity, like it does with point light sources. Perfectly collimated beams should have very little dispersion of light even over large distances. Solar simulator light sources lie somewhere in between these extremes. Here, the light needs to be focused through some sort of lenses or optics to ensure the light distribution is spatially uniform. However, it is nowhere near a perfectly collimated beam so the intensity of light will vary noticeably according to distance from the solar simulator. However, this will also not follow the inverse square law of intensity. For this reason, it is important that you ensure your light source is the correct distance away from your sample stage.
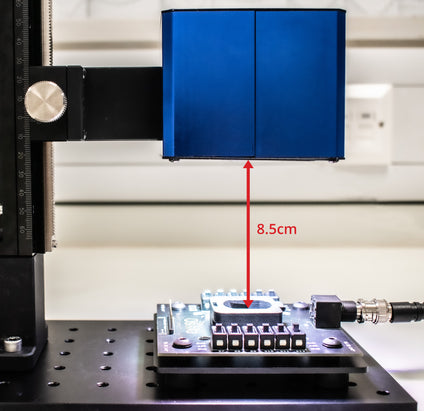
For example, the Ossila LED Solar Simulator Lamp should be 8.5 cm from the bottom surface of the solar simulator to ensure calibrated 1 Sun irradiance. Remember to measure this distance from the top of your sample, not just the top of the measurement system. The total irradiance over the test area can be confirmed using a reference cell.

Most solar simulators, including the Ossila Solar Simulator, will be calibrated during manufacturing and will have a classification rating. Having said this, it is important to confirm at least the spectral intensity of your solar simulator during initial set-up, and at regular intervals after this. This is especially important for arc lamp solar simulators, as the spectrum of these lamps will change after ~1000 hours and will need to be replaced.
You can check the average irradiance of your solar simulator using a reference device, such as a reference solar cell or photodiode.
How to check average irradiance of a solar simulator
-
Turn on your solar simulator light source and allow to stabilise.
-
Place the reference device where your sample will be and fix in place. Try to be as accurate and consistent as possible in this placement.
-
Measure the light intensity of your reference device relative to 1 Sun.
-
Vary the input power to your light source or the distance between light source and sample stage, until the desired power density is achieved. For normal spectral conditions, this should be 1 Sun = 1000 W/m2 = 100 mW/cm2
Control Elements and Power Supply
The complexity of the control elements you need for a solar simulator will depend on the type of light source you are using. In general, you will need a different power supply for each light source you have. If you are using a broadband light source such as a Xenon arc lamp, you will require only one power source, with no need for complex control circuits.
However, in LED arrays you combine a series of narrow-band emission LEDs to create a spectrum close to AM1.5G. Each of these LEDs will need an individual power source, and the power delivered to each of these sources should be controlled individually, in order to accurately replicate solar irradiance. Although this will require more complex electronics, this will give you more control over your solar simulator's spectrum. For example, you can select individual LEDs to illuminate your sample with, so you can test the light-depending processes under specific wavelengths of light. Additionally, by varying the power supply to each LED, you can alter the spectrum of your solar simulator — for example to represent an indoor spectrum.
As you increase the power supplied to a light source, its output intensity will increase. Most solar simulator lamps require a constant-current (DC) power supply to provide temporally stable irradiance. For example, variations in power supply to an LED lamp can result in lamp flickering, which compromises the short-term instability of the light source. Additionally, inconsistent power supply to arc lamps can accelerate electrode degradation, further reducing the lifetime of these light sources.
The LEDs that are used to provide the same spectral irradiance as arc lamp simulators have relatively low operational currents. Therefore, it is easy and inexpensive to source the appropriate power drivers. However, LED-based solar simulators need to combine multiple LEDs to cover the necessary spectral range. Therefore, ensuring that each LED emits light at the correct intensity without variation requires more complex control systems. Arc lamp systems require little programming or complex control systems, as a single bulb acts as the source. However, arc lamps, such as xenon arc lamps, require larger currents to function, so the necessary power drivers tend to be more expensive.
Optics: Lenses and Filters
Again, the type of optics that will improve your solar spectrum simulation will depend on what light source you are using. Arc lamps readily produce a broad spectrum which represents most of the solar irradiance spectrum well. However, some lamps, such as xenon arc or metal halide arc lamps, show large intensity peaks in the IR wavelengths. You can reduce these peaks with the use of IR filters, in order to more accurately replicate AM1.5/AM0.
By the time sunlight reaches the earth, the rays are essentially parallel to one another, meaning that solar irradiance is distributed uniformly across a given surface area. Therefore, it is important that the light produced by your solar simulator is uniformly distributed across the "test area" used. You therefore need to produce a collimated beam. Additionally, if you are using multiple light sources (for example an LED-array), it is important that this light is "blended" uniformly across the test area. Optical lenses can be used here to ensure the light is directed uniformly across a surface area. For our LED light sources, we used a total internal reflection lens to produce a uniform collimated light source directed at the test area.
Solar Simulator

Learn More
 Solar Simulator Light Sources
Choosing the right light source for your solar simulator is one the most important decisions to make when setting up a PV testing laboratory
Read more... Solar Simulator Classification and Calibration
Solar simulators must be evaluated according to one of the three standards, and comply with the specifications set out within.
Read more...